...ate a York Peppermint Patty in a men's restroom. You don't even wanna know.
...learned that doubling recipes is dangerous business. I have puddles of what should be pecan sandies. Why, oh why, do these things happen when I'm baking for a reason?
Monday, January 31, 2011
Wednesday, January 26, 2011
Peanut Butter Oatmeal Chocolate Chip Cookies
These are a mouthful, in more ways than one.


[Courtesy of Brown Eyed Baker]
Ingredients:
1 cup all purpose flour
1 tsp baking soda
1/4 tsp salt
1 stick unsalted butter at room temp
1/2 cup creamy peanut butter [although crunchy would be fine also]
1/2 cup granulated sugar
1/3 cup light brown sugar
1/2 tsp vanilla extract
1 egg
1/2 cup oats [not quick-cooking]
1 cup semi sweet chocolate chips
Directions:
Preheat your oven to 350. Line 2 baking sheets with a silicone mat or parchment paper.
In a small bowl, whisk together the flour, baking soda, and salt.
In a larger bowl [with your mixer on medium], cream together the butter, peanut butter, sugars, and vanilla. Add in the egg and beat to combine. With the mixer on low, slowly incorporate the flour mixture. Finally, stir in the oats and the chocolate chips.
I used a large cookie scoop [equal to a scant 1/4 cup] and placed the cookies about 3 inches apart on my baking sheets. I ended up with 16 cookies. You'll want to bake them for about 12 minutes. They won't seem done, but let them cool on the pan for a couple minutes before transferring them to a wire rack. I recommend eating at least one while they're still hot. ;)

These are the kind of cookies that stay chewy! They'll be golden brown on top and heavenly in the center!

These were a big hit with my husband and the concession stand at our Upward league.
Happy baking!
Monday, January 24, 2011
Dark Chocolate Cupcakes with Peanut Butter Frosting

For the cupcakes, you will need:
8 tablespoons (1 stick) unsalted butter, cut into 4 pieces
2 ounces bittersweet chocolate, chopped
½ cup Dutch-processed cocoa powder
¾ cup all-purpose flour
½ teaspoon baking soda
¾ teaspoon baking powder
2 eggs
¾ cup granulated sugar
1 teaspoon vanilla extract
½ teaspoon table salt
½ cup sour cream
Preheat the oven to 350. Line a standard muffin pan with 12 liners. You'll get 12 cupcakes.
Over a double-boiler, heat the butter, chocolate, and cocoa. Make sure the water is just barely simmering in the pot so the chocolate doesn't seize. Slowly melt it untl it comes smooth. You could microwave it, but it's more work than just using a double-boiler. Once it's melted, set it aside to cool.
Whisk the flour, baking soda, and baking powder in a small bowl. In another larger mixing bowl, whisk the eggs until fluffy. Then add in the sugar, vanilla, and salt until fully incorporated. Add the cooled chocolate mixture and whisk to combine. Sift about 1/3 of the flour mixture over the wet ingredients. Stir to combine, then add in the sour cream followed by the rest of the flour mixture [again, sifted]. Be sure to gently stir this at each stage so as to not make the cupcakes tough. We want little pillows of rich chocolate desire here, kids. Then just bake for 18-20 minutes or until your cake tester/toothpick comes out clean. Let them cool on a wire rack completely before frosting.

1 cup 10X [powdered] sugar
1 cup creamy peanut butter
5 tablespoons of butter at room temp [unsalted, please]
3/4 teaspoon vanilla extract
1/4 teaspoon kosher salt
1/3 cup heavy cream
Mix all of the ingredients together at once, minus the heavy cream. When everything is smooth and dreamy, add in the cream. Mix on high until it is light and smooth.

Either way, eat one of these with a friend.
Or your lover, which is what I did because we gave the rest of them to college students.
Saturday, January 22, 2011
Valentine's Day Wreath
From September through the first of January, my house is full of festive holiday decorations. From pumpkins to scarecrows, turkeys to Christmas trees, twinkle lights to cheerful wrapping paper, my house looks great. Come January 2, my house is naked. With the chill of winter, I so want my home to have that cozy feel from the past few months but it just isn't there. This year I decided to do a little Valentine's decorating, starting with this wreath. I'll give you a little tutorial, but know that I'm no authority on crafting. This is one of those wreaths where you tie pieces of fabric around a foam circle. Here goes:


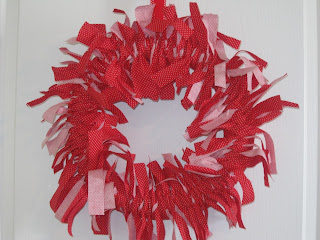


You'll need one of these styrofoam circles from the craft store. They even have heart-shaped ones if you're feeling really festive. I had 2 kinds of fabric so it would have some detail, but the lighter paisley one frayed too much. I just had to stick with the red polka-dotted one.

You'll need to lay a foundation to prevent peeks of the ugly green foam from showing through your fabric pieces. I used some scrap ribbon and also pieces of the fabric I was using to do this. I secured it with my glue gun.

I decided to make each piece about 1 inch wide and 12 inches long. Do you see my makeshift cutting board? I don't have one of those self-healing mats [read: YET] so I decided to make one from a cake board. It was a dumb idea. I ended up just cutting on the table and it was fine. I'm just trying to save you from the same mistake.

Once you have your fabric strips cut [I used way more than this], you're ready to begin!

Here's a closeup of the side. I added pieces of ribbon to break up the monotony of the fabric.

I think it would look better if the fabric was colored on both sides. Oh well; if at first you don't succeed, tie, tie again! Ok, that was corny.

I hot glued a piece of strong ribbon to the back and made a loop to hang it with. It looks great on our bedroom door! I hope this inspires you to give your house a little winter pick-me-up.
Thursday, January 20, 2011
A list
1. The dog keeps destroying "indestructible" dog toys. I don't know if I should be mad at her or send her in for evaluation. What kind of dogs are they testing these things on, poodles?
2. After tonight's crafting fiasco, I'm really mad that I can't just get in the car and drive 2 miles to Joann's like I used to be able to do. Grrr. There's nothing worse than an angry girl with a rotary cutter.
3. I've had my sewing machine for 5 months and I still don't know how to use it. Help.
4. We watch entirely too much tv and don't play nearly enough Mexican train dominoes. That's for you, Coco.
5. I bought my mom a steam mop for Christmas. Now that I know how awesome they are, I feel that mopping my floor is useless. I'll just keep saving my pennies for my own steam mop. And I won't mop again til I get one. I won't, I won't, I won't.
6. I wasn't meant to work. Really, I wasn't.
7. I have conquered nail biting. I even paint my nails all the time now!
8. I'd just as soon eat beans and cornbread rather than something fancy.
9. Lately I'm addicted to this breakfast item: boiled egg, sliced, put on buttered toast with freshly cracked pepper and sea salt. A-ddict-ed.
10. Justin would like to start his own "Knights of the Night" group. [Insert Office reference here.]
11. Maybe tomorrow I will post about something useful.
Monday, January 17, 2011
Pumpkin Doughnut Muffins
Have you ever heard of "doughnut muffins"? Apparently they're all the rage. I came across this recipe several months ago over at Tasty Kitchen. I keep a running list of recipes to try and yesterday morning for our college Bible study was the time to try them out. I had some leftover sugar pumpkin puree from November in my freezer that really needed to be used. :)
 Ingredients:
[Muffins]
1 1/2 cups All Purpose flour
1 1/2 tsp baking powder
1 tsp pumpkin pie spice
1/2 tsp salt
1/2 cup sugar
1 stick butter
1 whole egg
1 cup pumpkin puree
1 tsp vanilla
1/2 cup milk
[Topping]
1 stick butter, melted
1 tsp cinnamon
1 tsp pumpkin pie spice
Directions:
Preheat oven to 350.
Stir together all of the dry ingredients and set aside.
In a separate bowl, cream the sugar, butter, and egg. Then mix in the pumpkin and vanilla.
Alternate adding the dry mixture and the milk to the wet mixture. Be careful not to overmix.
You can either make regular sized muffins and bake for 20-25 minutes or mini muffins [what I did] which will need to bake for 12-15 minutes, or until a cake tester comes out clean. I ended up with 32 mini muffins. It is important to note that you do not need to use muffin liners. Just make sure your pan has been oiled before filling with the batter.
For the topping, you'll want to have the butter melting on the stove over a low heat while the muffins are baking. In a bowl big enough for dipping the muffins into, mix together the sugar, pumpkin pie spice, and cinnamon. Once the muffins have come out of the oven and cooled for a couple minutes, dump them out on the counter so you don't burn your little fingertips on the muffin tin trying to get them out. The original recipe suggests dunking the entire muffin in the melted butter and then rolling in the spiced sugar. I just dipped the top in for time's sake, but you can do whatever you want because you're the boss when you're cooking.
Cook's Notes:
You can substitute whole wheat pastry flour or white whole wheat flour in place of half of the all purpose flour. You could also avoid the processed white sugar by using organic turbinado or even sucanat. These aren't calorie free, but there is a way to make them a little "better". Also, I never have pumpkin pie spice on hand so I just used cinnamon and a dash of cloves.
I know it's hard to find canned pumpkin this time of year [if you don't have some in your freezer] but I am quite sure you could substitute banana, sweet potato, or even applesauce.
These "muffins" are the most moist and delicious that I have ever tasted, and they were a BIG hit with the college students! I would definitely say that this is something you've GOT to make. The texture is amazing and well, just try it!

Sunday, January 16, 2011
P.R.I.D.E.
Do you ever feel prideful? [Don't answer that.]
The following is a little excerpt from Beth Moore's Praying God's Word.
My name is Pride. I am a cheater.
I cheat you of your God-given destiny...because you demand your own way.
I cheat you of contentment...because you "deserve better than this."
I cheat you of knowledge...because you already know it all.
I cheat you of healing...because you're too full of me to forgive.
I cheat you of holiness...because you refuse to admit when you're wrong.
I cheat you of vision...because you'd rather look in the mirror than out a window.
I cheat you of genuine friendship...because nobody's going to know the real you.
I cheat you of love...because real romance demands sacrifice.
I cheat you of greatness in heaven...because you refuse to wash another's feet on earth.
I cheat you of God's glory...because I convince you to seek your own.
My name is Pride. I am a cheater.
You like me because you think I'm always looking out for you.
Untrue.
I'm looking to make a fool of you.
God has so much for you, I admit, but don't worry.
If you stick with me
you'll never know.
We are most useful to God when we are poured free of self and full of Christ.
Thursday, January 13, 2011
Peanut Butter Pretzel Tart

If you like sweet and salty, you're going to love this. I found this recipe in Everyday with Rachael Ray. It's a great make-ahead dessert that yields impressive results.
You will need a 9 inch tart pan with a removable bottom. My tart pan is a little larger than that so you won't see the crust up the sides of my tart. I suppose you could make a variation in mini tart pans as well--how cute! This dessert will serve 8 regular people or 16 people watching their weight.
For the crust:
2 cups broken salted pretzel pieces/sticks
1/4 cup brown sugar
1/8 tsp salt
6 Tbsp butter, melted and cooled
Preheat oven to 350. Using your handy dandy food processor, finely grind the pretzels, brown sugar, and salt. Transfer to a bowl and then evenly stir in the melted butter. Press evenly on the bottom of your tart pan and up the sides if you can. Bake until lightly brown around the edges, about 18 minutes. Let it cool on a rack while you're making the filling.
For the filling:
4 oz. cream cheese, softened
3 Tbsp softened butter
1/2 cup peanut butter
1/4 cup brown sugar
1 cup heavy cream, chilled
1 tsp vanilla
Using an electric mixer, beat the cream cheese, peanut butter, and softened butter at medium-high speed until fluffy [about a minute]. Then beat in the brown sugar.
In another bowl, beat the cream and vanilla until soft peaks form, just like making whipped cream. Then fold the cream into the peanut butter mixture. Be gently so you don't flatten the whipped cream.
Evenly spread the filling into the tart pan. Cover with plastic wrap and chill for at least 3 hours before serving.
The recipe calls to top it with fresh caramel, but I simply couldn't be bothered with that when I served this. I just melted some good milk chocolate and drizzled it over the top. It was amazing! Not too sweet with just the right peanut buttery taste. We were having lunch guests on Sunday so I just put it together Saturday night. It was one less thing to think about while I was entertaining. Try it!
Wednesday, January 12, 2011
Chocolate Chocolate Chip Banana Bread

Baking: From My Home to Yours by Dorie Greenspan
Chocolate Chocolate Chip Banana Bread
You will need:
2 cups all purpose flour [I tried to sub whole wheat--don't do it]
1 cup unsweetened cocoa powder
1 1/2 tsp baking powder
1/2 tsp salt
1/4 tsp baking soda
1 stick [8 Tbsp] unsalted butter, at room temp
3/4 cup sugar
1/2 cup brown sugar
2 large eggs
2 ripe bananas, mashed
3/4 c buttermilk
3 oz. bittersweet chocolate, coarsely chopped
Directions:
Center a rack in the oven and preheat to 350.
Butter or lightly oil a 9x5 loaf pan and place on a cookie sheet to keep the bottom insulated. That will keep the bottom of the bread from overbaking.
Sift together the flour, cocoa, baking powder, salt, and baking soda.
In your mixer's work bowl or a large bowl with a hand mixer, beat the butter until it's really soft and then add in the sugar. Cream for 2 minutes.
Add the eggs one at a time, mixing inbetween. Reduce the mixer's speed to low and add in the bananas
Add the dry ingredients in 3 stages, mixing just until it disappears into the wet. You want to be so careful not to overmix.
With the mixer on low, add in the buttermilk until incorporated. Fold in the coarsely chopped chocolate. Scrape batter into prepared pan.
Bake for 30 minutes. Then, lightly cover with foil and bake for 40-45 minutes more. The foil will keep the top of the bread from becoming too dark. Total baking time is 70-75 minutes, or until a thin knife comes out clean from the center.
Place the pan on a cooling rack for at least 20 minutes. Then run a thin knife around the edge of the bread and invert onto the rack to finish cooling.

Cook's notes:
I tried to sub in half whole wheat flour. It made it too dry, I thought. Also, this bread is very chocolatey so if you don't like chocolate, you probably won't like this. Just a word of warning! It's not to sweet so I think it makes a great breakfast...........if you're into that sorta thing. ;)

Tuesday, January 11, 2011
How to save money without using coupons
I don't use coupons. This is going to make some of you cringe. I hear people say things like their total was $184 and they only paid $62. I think it's amazing. But I just don't do it. I tried it, and I thought it was a lot of work to save $3 here and there. When I look at coupons, there aren't coupons for things that I use. I'd cut out coupons and then find that the store brand was less expensive. I'm one of those people who only buys produce, meat, and a few staples here and there. We don't buy chips, granola bars, or frozen food. We rarely have cereal. So coupons just don't work for me. I want to share a little bit of my philosophy on groceries and how I save money. I know I probably spend more than most people, but I have some tips that I think will help people using coupons or not, shopping organically or not.
Where we live now, we have to drive an hour and a half to get to Whole Foods. We do this every other week or so. We get looks from people when they find out we shop there. I have found that most people who talk bad about stores like Whole Foods have never even stepped foot inside it. Case and point: my inlaws. We asked them to bring us down some milk when they visited on Sunday. They had never been, but I'd seen the "look". When they got to our house with the milk, they mentioned that they were excited to shop there soon. Hmmm... :)
Let me tell you about the milk we buy. It's from a local dairy farm, stored in glass bottles [extra cold!], and pasteurized at a low temp to keep its nutrients. It's $3.14 a half gallon. Before you get all up in arms, hear this: there's a bottle exchange. I get $2 CASH back for every bottle I return to Whole Foods, meaning I pay $1.14 per half gallon, or $2.28 a gallon for some of the best quality milk in the state. Do you know how much a gallon of Wal-Mart brand milk is in my town? $3.39! So I am saving over a dollar by purchasing this amazing milk at a 'snobby' grocery store.
We have always, in our marriage, strived to eat good food. Not just good tasting, but good for us. Even when my husband was in seminary and we had a tiny income, we still shopped at Central Market in Fort Worth, TX. The key to shopping for this type of food is knowing what to buy and when to buy it.
By no means do I purchase everything 'organic', 'all natural', etc. I've been balancing a grocery budget for a while now and the biggest thing I've learned is to supplement. I buy what I can at Whole Foods, the farmer's market, or the local co-op and then fill in the rest from either the local grocery store or Target. Well, Wal-Mart where I live now. If I can't afford a certain thing, I just don't buy it this time.
Before I offer my tips on saving money while eating organically, I do want to offer a disclaimer of sorts. Sometimes people can barely afford to put food on the table, much less purchase an organic air-chilled chicken. I know what that feels like; I grew up that way. Eating good, healthy food [organic or not] is what's most important. I will say, however, that just because you have a low income does not mean you should live on cheetos, spaghetti, and balogna sandwiches. Wherever you are in your grocery budget, I just want to encourage you to buy the best that you can to provide nutrients, not just a full stomach.
There is an ongoing debate on the necessity of eating organically. If we could go back to the time in which our grandparents were growing up, everything they ate was essentially organic because food was not processed the same way that it is today. "Processed", unfortunately, is the problem. I saw the movie Food Inc. a while ago, and it further opened my eyes to the food industry in America and encouraged me to get back to basics. I won't go as far as to jump on the emotional bandwagon that this movie ensues, but it is educational about the major companies that control agriculture and the lack of government involvement thereof.
We have a strict budget in our family, and I alot $300 per month for groceries [for two people]. I don't know if that's too much or not, but it works for us. Sometimes I don't spend it all, so we save it for times when we want to have others in our home for a meal or have a special occasion coming up. I've been sticking to a budget and shopping for whole foods for about 5 years now, and here are some of the guidelines that I use.
1. Meal plan, meal plan, meal plan. I can't stress this enough. If you will sit down and plan out your meals I promise you will save money. You can start out by planning 1 week at a time, or even plan out the whole month. I plan out 2 weeks at a time because I go to the grocery store when Justin gets paid. Ideally, you purchase all of your needs and eliminate extra trips to the store. I like to pay cash for my groceries, and I walk around with a calculator in the store [much to Justin's embarassment]. I usually do make a quick trip inbetween big shopping trips to stock up on fruit/produce, but that's about all we ever run out of. If we decide we want to make something that we don't have the groceries for, we just plan for it on the next meal plan. We used to decide we wanted a certain thing for dinner and go spend $25 extra at the store when we already had plenty of groceries. Well, not anymore! I'm sure I've saved us hundreds by doing this. Besides, who likes stopping by the store on their way home from work? It's kind of fun to see our meal plan up on the fridge. Justin really enjoys that. I would add that it's always good to have a couple of meals that you can exchange if the prices aren't good on certain items when you go to the store.
2. Stick to your list! When you buy lots of extra things that you didn't really need you're going to spend more money. There is a loop hole though, and that loop hole is price. Sometimes I might have a need for eggplant or pork tenderloin, and when I get to the store I either don't like the looks of the eggplant that day or the pork is expensive. So that's when I engage in substitution. It's ok to change what's on your list, but don't add to it. Adding is a sure fire way to spend more than you want.
3. Look for private label organic brands. The best is Trader Joe's. I don't get to shop there anymore since there isn't even one in our state, but we do periodically travel back to Atlanta or pass through Nashville or Cincinatti where we can stop in at one. I buy a lot of the Whole Foods brand, 365. I'm pretty satisfied with it and when I compare it to store brands like Kroger and Wal-Mart, I'm paying about the same.
4. Freeze the surplus. After a while of sticking to your budget and meal planning, you'll find yourself stocked up on things. That means that sometimes you don't have to spend all of the money that you normally budget. You can save it or use the extra $10 or $12 on stocking up on produce which you can then freeze to have on hand.
5. Canning/freezing. If you have the space in your freezer or cabinets, spend the summers canning and freezing. It's a great way to have fresh produce that you grew or picked up at the farmer's market all year long. You'll have to spend some money on the front end purchasing materials for canning [freezing doesn't take much] but it will pay for itself in one season of canning. And, you won't have to replace the canning materials for a long time, if ever.
6. Purchase whole chickens. Some people can be so dramatic about this. "I don't like chicken on the bone", they say. Well, you don't know what you're missing! The flavor is so much bolder when chicken has been cooked on the bone. I buy whole chickens and roast them. Sometimes I put compound butter under the skin and fill the cavity with lemons and onions; other times I just coat with salt and pepper and drizzle with olive oil. I start the oven at 425 degrees for about 15 minutes to crisp the skin and then turn it down to 350 to finish the cooking. I take the meat off and put it into 2 cup portions in freezer bags and have it ready throughout the week to put in soups, tacos, or salads. I then take the bones and skin and make my own chicken stock. It's a big money saver!
7. Frozen fruits and veggies. This can be a big money and time saver. Sometimes fresh produce is more expensive that frozen. There are great organic options in the freezer section, but beware that the portions are smaller. You can stock up on frozen fruit for smoothies and you don't have to spend time chopping and peeling. Frozen veggies are ready for soups and casseroles in a flash.
8. Don't buy microwave popcorn. It's so much more expensive that purchasing popcorn kernels. Popcorn made on the stove or in an air popper is so tasty and definitely healthier than microwavable. It also doesn't take any more time to make it. The only difference is having to was the pot or machine you made it in. If you haven't tried making your own, I encourage you to do so on the next movie night and I bet you'll agree with me.
9. Make your own food. Bread, chicken stock, butter, jams, applesauce, vanilla extract, tortillas....these are just a few of the items that I make myself. Remember, simple doesn't always mean easy. I know when you have a job and kids, time is of the essence. It's really easy to let your grocery store do the work for you. I believe, however, that with proper planning and setting aside a Sunday afternoon, you can prep all that you need for the week. You'll find that a little preparation will actually give you more time after school with the kiddos because you won't be worrying about having to stop by the store or figure out what to eat for supper. Sometimes we sacrifice goodness for convenience at the grocery store. I'm not asking you to be Little House on the Prairie and sew your underpants while tending to the chickens, but making your own food is a good thing. It helps me feel connected to my food and my body when what I made with my own two hands is what's nourishing myself and my family.
10. Relax. It's just food. If you can't get meal planning done, don't sweat it. Keep a pan of lasagna in your freezer for emergencies. If all else fails and you have to order pizza, don't worry about it. You can eat lighter the next day. No one is perfect--certainly not me--but we can all try our best to make shopping and getting great meals on the table easy and fun.
I hope you find my tips helpful and healthful. Sticking to a healthy diet and budget are a great way to start 2011.
Sunday, January 9, 2011
Resolve
Did you make resolutions for 2011? Wanna lose 10 pounds, clean out your closet, or take a trip across the ocean?
The start of a new year is always exciting. The older I get, the more impactful it is. When you're growing up a new year might have meant that you were about start basketball season, or you were getting your learner's permit, or finally going off to college. Now that I'm well into adulthood and past those milestones, starting a new year is a time to exercise reflection and gratitude. Not only upon what has happened, but on what is to come.
It seems that folks like to declare that they will do something or other on the first day of the year. First of all, I believe that the moment a resolution is shouted from the rooftops is the moment it is failed. I always feel that with resolutions it's best to keep your mouth shut. That way if you fail, no one has to know. ;)
Christmas, with all its hustle and bustle and travel doesn't allow much time for focus on resolutions. This year we were gone from Christmas day through New Year's Day. Once we got home, put up the tree and all of the holiday decor, it was time to settle in for winter. I usually start thinking about the possibilities of the new year around the sixth or seventh day of it. But that's ok because I'm usually late, and that is not a quality about myself that I am willing to change at this point in my life. [I make up for my punctuality with being oh-so-honest.]
There are things I want to accomplish, like finally learn how to use my sewing machine, run a 5K without stopping to walk, take my blog to the next level, and just really grow my business. These are just a few things that I'd like to do, but I won't beat myself up if I don't. I wouldn't label them as "New Year's Resolutions".
I struggle with being indifferent, can you tell?
What I did come up with were two words that I want to focus on as I walk through this year of my life.
SEEK
...a deeper relationship with God
...relationships with others [more on this later]
...opportunities to serve a specific global need
...to daily bless my husband by joyfully tending to our home
GUMPTION
Let me explain. If I think about the women I admire most, it wasn't just their countenance, abilities, or achievements; it was their gumption. I want to make things happen this year. There are private goals that I have set for myself, financial goals that my husband and I have, and general desires that I would like to make happen. When I lost my job over 1 year ago, I took several months to just be quiet, reflect, and lick my wounds. While I haven't been sitting around depressed for a year, I have let time pass by without making some needed changes. I'm ready to gather up some gumption and move forward!
2010 was a crazy year for us. I lost my job in January and couldn't find another one. There was a big mess over compensation from the situation. We felt like we were in seminary again, praying for the loaves and fishes to multiply at times. By June we had uprooted our life and moved from Atlanta to rural Kentucky. Major yuck. I won't pretend to love it here, but I'm getting used to it. Don't take it personally. If you do take it personally, then let me encourage you to imagine yourself in a similar situation. When you uproot yourself like that, there's undoubtedly a period of uncertainty to follow. Did we make the right decision? Is this what God wanted? But now that we've turned the corner of a new year, it's time to put all that behind and move forward.
Seek. Gumption. Seek gumption. They work just as well together as separate.
If you didn't make resolutions, don't worry. But I do hope that you can take some time and find a word or two to be your theme for 2011. Write it on your bathroom mirror or some place where you can be reminded throughout the day of what you want to achieve, and where you'd like to find yourself next year.
Wednesday, January 5, 2011
Granola
Since we're being all healthy here in the new year, I thought I'd share this great recipe for granola. When I arrived at my parents last week, there was a gallon-sized bag of this granola sitting on the table. My sister-in-law had made it and brought it with them as a road trip snack [not a bad idea when you're driving cross-country]. It was the BEST granola I've ever eaten. I make some pretty good varieties, but they're usually packed with peanut butter and chocolate chips rendering them not-so-healthy. So here's the recipe from my sister-in-law, Sara. She got it from All Recipes.
Ingredients:
8 cups rolls oats
1 1/2 cups wheat germ
1 1/2 cups oat bran
1 cup sunflower seeds
1 cup finely chopped almonds
1 cup finely chopped pecans
1 cup finely chopped walnuts
1 1/2 tsp salt
1/2 cup brown sugar
1/4 cup maple syrup
3/4 cup honey
1 cup vegetable oil
1 tbsp ground cinnamon
1 tbsp vanilla extract
2 cups dried fruit
Directions:
Preheat oven to 325. Line 2 baking sheets with foil and lightly oil.
Combine oats, wheat germ, oat bran, seeds, and nuts in a large bowl.
In a small sauce pan, combine salt, brown sugar, maple syrup, honey, and oil. Bring to a boil and then pour over the dry ingredients.
Spread mixture evenly on the cookie sheets.
Bake in the preheated oven until toasted and not sticky, about 20 minutes. Stir it once halfway through the cooking.
Cool thoroughly and then stir in the dried fruit. Be sure and store in an airtight container.
You can use and combination of nuts, seeds, and fruit that you prefer. The granola that my sister-in-law made didn't contain dried fruit, which was fine with me because I don't like that!
Here's the nutritional info:
Servings per recipe: 30g
Calories: 369g
Carbs: 45g
Dietary Fiber: 5.8g
Protein: 8.3g
Sodium: 121.9g
Fat: 20g
Cholesterol: 0mg
Tuesday, January 4, 2011
I'm back, baby!
Did you know I was gone? Hmm. Well, anyway, I have taken a little blogging hiatus due to the fact that I was so busy with Christmas and simply couldn't make time for this. Sometimes, something has to give. Therefore, this post is bound to be choc full of word vomit.
I spent the week of Christmas buried under 210 dozen cinnamon rolls, give or take 200. There were many other catering items on the list that had to be delivered by Christmas Eve. I ain't doin' that again.
We had a White Christmas! I mean, WHITE! I'd share some photos but the camera cord is MIA at the moment. It's probably in my suitcase, which is only halfway unpacked. On Christmas day, we tracked through the snow up to my inlaws, which is 2 hours away. It was a nice day. It was kind of sad, though, because 2 of the family members weren't with us this year, and won't be ever again.
The day after Christmas we loaded up after church and drove through more snow [I think there was 7 inches when we left our house] to my parents house in NC. Actually, because of the weather, we went south to Atlanta to spend the night. We put out a desperate tweet [thank goodness for social networking!] and some friends answered our plea for a place to sleep, dog and all! We got to have breakfast with some dear friends so all in all, I was thankful for the snow! We arrived at my parents that night and spent 4 days there. My brother and his wife, whom we had not seen in about 3 years also drove in from TX. We had a 55th Anniversary party for my grandparents and even my aunt and cousins got to come in for that! It was great to have so much family time. At my parents house, there were 6 people and 5 dogs. Let's just say Bailey had the time of her life.
What about you? Did you have a nice Christmas? Get anything good like an iPad or new sheets? I got neither, but those are pretty good gifts in my book. I did get some new cookbooks and the pasta attachment for my Kitchenaid. No more rolling out pasta by hand---hooray!
Well, speaking of pasta, I'd better go now. I'm making fettuccine Alfredo with chicken for a college basketball team tonight. If I don't blog tomorrow, you'll know I was buried under a sea of Parmesan.
Subscribe to:
Posts (Atom)
